Tip of the Day 89: In Decoupled 2 Use First Stage as End of Fill
This is a follow-up to the idea of using templates for machine setup (tip # 87). Here is a convenient method to let the machine tell the eDART where end of machine fill is instead of setting the fill volume on the eDART. In Decoupled 2 processing the end of First Stage (also known as “boost”) IS the end of the machine’s filling portion of the cycle. Using this signal and making a short shot you can use the eDART‘s instrumentation to accurately match the filling (flow) part of a process even without cavity pressure sensors.
If you have wired the machine’s first stage output to the eDART‘s sequence module then the eDART knows when machine fill ends. But you need to tell the eDART not to set the fill volume automatically. You can do this by setting a large number on the eDART‘s Sequence Setting fill tab (but not 10,000 cu. in)
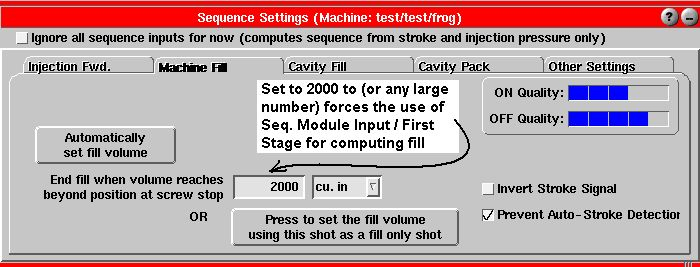
Once set, the eDART will not use the volume to figure out where fill ends but will instead always use the end of Seq. Module Input / First Stage. This is recorded with the process (mold/material/cavity combination) so that you do not need to set it again each time the process is run.
Now when you set up the process on a new machine you simply need to match the fill-only part weight and the fill time as computed by the eDART. In the fill-only shot below the eDART is using the volume zero crossing to determine the start of fill and the end of first stage for the end of fill. Thus the computed value Sequence Time / Fill is the length of time that Machine Sequence / Fill is on.
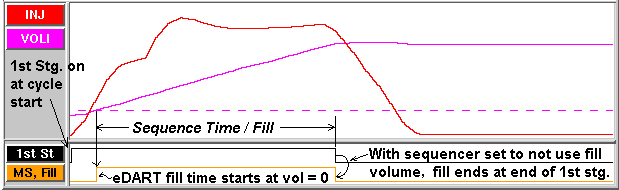
Notice that the injection pressure curve for the mold used above is one of those that prevents us from using peak injection pressure to figure out the end of fill. There is an early restriction in the mold that creates a first peak that is higher than the peak at the end of filling.
In order match a process on a different machine using the eDART you could use the following steps. Note that this will only work if all of your machines have Seq. Module Input / First Stage wired to the eDART‘s sequence module. Use the cycle values set up as described in tip #73.
- When the process is first set up be sure to set the Sequence Settings fill volume to some large number (not 10,000).
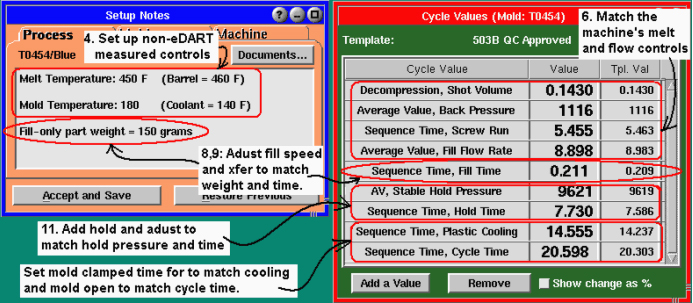
- Record the fill-only part weight or size for the fill-only shot. Without cavity pressure sensors this is your only access to an “in-cavity” measurement. You could use the “Setup Notes” tool for this purpose and perhaps even add a photograph. (tips #71 and 72).
- Save a template for the finished process on the first machine.
- When the mold runs in a different machine adjust the machine and temperature controller to match the melt temperature, mold temperature (also recorded in Setup Notes).
- Begin by making fill only shots.
- Adjust machine to match decompression, backpressure, screw run time and fill flow rate in the template column of Cycle Values (tip #73).
- Add Sequence Time / Fill to the Cycle Values on the eDART.
- Adjust the transfer position to get the same fill-only part weight or size.
- Re-adjust the machine’s fill speed to match the Sequence Time / Fill on the Cycle Values.
- Repeat steps 8 and 9 until you get the same fill-only part in the same fill time shown by the eDART.
- Complete the rest of the match by setting the machine to match the other values: hold pressure, hold time, cooling time (start of fill to end of mold clamped) and cycle time.
- Check the parts for quality: no sinks, flash etc.
- If desired, save a new template for this machine (as in tip #87)
Now that’s a rather long list. Let’s have a go at trying to do it in a numerical form from the eDART‘s screen…